Add Row
Add Element
cropper
update
Pleasanton Home Pro Media
update
Add Element
  • Home
  • Categories
    • Renovation
    • Doors
    • Lawns
    • HVAC
    • Painting
    • Pest Control
    • Handyman
    • Cleaning
    • Windows
    • Plumbing
    • Electrical
March 16.2025
3 Minutes Read

Transform Your Backyard with DIY Hot Tub Plans on a Budget

DIY hot tub plans featuring wooden design in lush backyard

Soaking Your Stress Away: The Joy of DIY Hot Tubs

Imagine this: after a long day of work, you slip into your own backyard oasis, a hot tub filled with warm water, relaxation enveloping you. It's a dream that many homeowners hold dear, but some think it's only achievable with a hefty price tag attached. Fortunately, a plethora of DIY options exist, tailored for those who want to unwind in comfort without breaking the bank. In this piece, we'll explore budget-friendly hot tub plans that you can easily implement, transforming your outdoor space into a serene retreat.

Why Opt for a DIY Hot Tub?

The allure of constructing your own hot tub lies not only in the savings but also in the opportunity to create something uniquely yours. You get to decide the materials, design, and heat source that matches your style and needs. As highlighted in various resources, making your own hot tub allows you to utilize upcycled or reclaimed materials, and the satisfaction of completing the project with your own hands adds a layer of fulfillment that can’t be purchased off the shelf.

Budget-Friendly Plans for Your Backyard Retreat

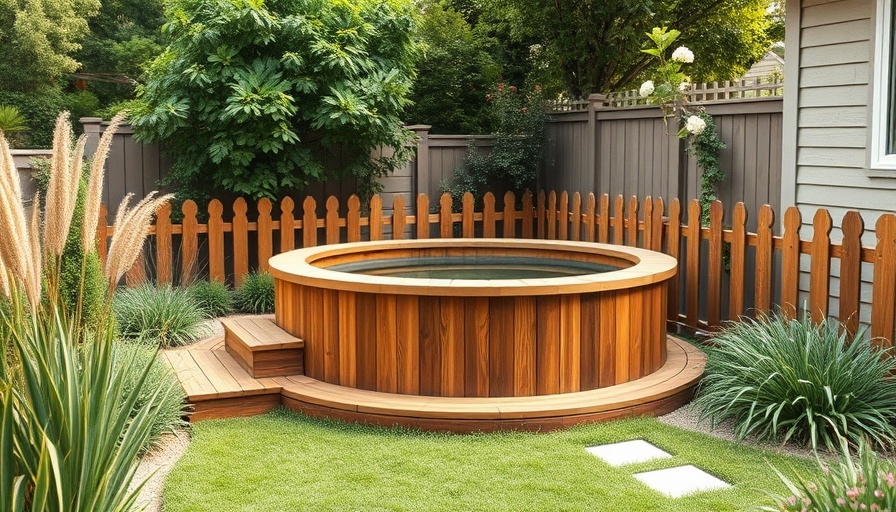
1. Cedar Hot Tub: One popular choice is the cedar hot tub. Cedar is naturally resistant to decay, making it ideal for hot tubs. The construction process involves cutting staves that will form the tub's outer structure, ensuring proper joinery to prevent leaks. A wood stove can be integrated for heating, allowing you to enjoy your tub even in the coldest months. Tips from builders emphasize selecting high-quality cedar to ensure longevity.

2. Japanese Hot Tub: This style is not only beautiful but functional. With a hexagonal bench inside and a heat source often placed externally, it offers a unique aesthetic that can be a focal point in your yard.

3. Concrete Hot Tub: For those seeking solidity, a concrete hot tub offers durability. The process includes digging a hole and laying a robust foundation. Once the concrete is set, you can shape it as you wish, making it perfect for small to large gatherings.

4. Stock Tank Hot Tub: Utilizing an old stock tank is a creative and straightforward method. You can add heating elements or jets based on your preference, and since they are typically designed for livestock, they are built to withstand the elements.

5. Pallet Hot Tub: If you have wooden pallets lying around, turning them into a hot tub is a fantastic way to repurpose materials. You can even finish this project in a weekend! You’ll end up with a rustic and charming addition to your outdoor space.

Considerations Before Building

When embarking on a DIY hot tub journey, a few practical aspects should always be in focus:

  • Size and Location: Choose a location that is accessible and sunny while ensuring enough space for the size of your hot tub. Measure your backyard to help decide on the right dimensions.
  • Budget: Keep in mind the costs of materials, tools, and any heating mechanisms you may choose.
  • Utilities: If you're connecting plumbing or electrical supply, make sure to follow local building codes to avoid any potential issues.

Final Thoughts

DIY hot tub plans are not just a great way to save money but also a way to breathe new life into your backyard. With a bit of planning and creativity, the hot tub of your dreams could be just a few steps away. So roll up your sleeves, gather your materials, and prepare to create a soothing oasis right in your home. Whether you prefer cedar, concrete, or something entirely unique, the satisfaction of a self-made retreat is unmatched.

Take the plunge and start your DIY hot tub journey now. You deserve a place to unwind!

Renovation

9 Views

0 Comments

Write A Comment

*
*
Related Posts All Posts
11.19.2025

Signs It's Time to Replace Your Old Driveway: Essential Insights

Update Identifying When It's Time for a Driveway Replacement Your driveway plays a crucial role in your home's curb appeal, safety, and property value. Yet, many homeowners overlook the signs indicating that it may be time to consider replacing their old driveway. In Michigan, the resilience of driveways is constantly tested by harsh weather, weight from vehicles, and the natural wear from time itself. Here are key indicators that it's time to take action. Signs Your Driveway Needs Immediate Attention One of the first red flags that your driveway may require replacement is the presence of cracks. It's normal for concrete to develop minor hairline cracks over time, but when these cracks begin to widen or deepen, or if they reappear after patching, major structural concerns are often at play. These cracks can indicate issues such as shifting soil, poor drainage, or the damaging effects of freeze-thaw cycles common in Michigan's climate. Moreover, you should be mindful of drainage issues. If you notice standing water or puddles forming in your driveway after rain, it's a sign that your driveway is no longer properly sloped to direct water away from your home, which can lead to erosion and damage not only to the driveway but also to the foundation of your house. The Impact of Michigan's Harsh Winters Michigan’s brutal winters can lead to deep surface erosion and spalling, which is the flaking of concrete surfaces caused by de-icing salts and temperature fluctuations. Once spalling starts to penetrate beyond the concrete's surface, repairs often become only temporary solutions, and replacement may be necessary. Opting for high-strength, air-entrained concrete during installation can significantly help combat future weather-related issues. Recognizing Uneven or Sunken Sections Uneven driveways can create tripping hazards and are often a symptom of underlying issues, such as poor compaction or soil settling. While small areas may be repairable through techniques like leveling or mudjacking, widespread sinking usually indicates more severe structural problems, suggesting that replacement is the more prudent long-term solution. Enhancing Curb Appeal with Modern Solutions Even if your driveway is structurally sound, an outdated appearance can diminish the overall aesthetics of your property. Replacing your driveway with contemporary design options—such as stamped, colored, or exposed aggregate—can boost your home’s visual appeal and overall market value. These modern finishes not only elevate the look of your property but are also resilient to the elements. Planning for Professional Help Before deciding to replace your driveway, it's important to consult with experienced concrete contractors who understand Michigan’s specific challenges. Companies like Rock Solid Exteriors specialize in durable installations that safeguard against our harsh winters while providing aesthetic enhancements that last. They utilize quality materials and expertise to ensure that you get the best value for your investment. Conclusion: Assessing Your Driveway's State Monitoring your driveway regularly for signs of damage is crucial to maintaining its functionality and appearance. Whether through cracks, drainage issues, or uneven surfaces, knowing when to replace your driveway can save you significant costs in repairs down the road. Don’t let a deteriorating driveway hurt your property’s value or safety—consider a professional assessment today!

10.17.2025

Unraveling Hardwood Floor Underlayment Options: Your Essential Guide

Update Choosing the Right Hardwood Floor Underlayment When it comes to installing hardwood floors, selecting the right underlayment is crucial for a long-lasting, comfortable experience. Many homeowners feel overwhelmed by the myriad options available in the market, each boasting unique features and benefits. This guide aims to simplify that decision-making process, allowing you to create the ideal foundation for your living space. What is Hardwood Floor Underlayment and Why is it Important? Hardwood floor underlayment serves two primary purposes: it acts as a moisture barrier and provides cushioning. Depending on your floor type and subfloor condition, the right underlayment can enhance comfort underfoot, reduce sound transmission, and protect against moisture damage. With the variety of underlayment options available, understanding their specifications and uses is essential. Top Underlayment Choices for Hardwood Floors Here’s a breakdown of some of the top underlayment choices, focusing on their unique advantages: 1. TrafficMASTER Polyethylene Foam - The Budget-Friendly Choice This lightweight and flexible underlayment provides a solid foundation for hardwood floors while being easy on your wallet. At just 2 millimeters thick, it has a self-adhesive strip that simplifies installation. Its moisture barrier properties make it suitable for various locations in your home. 2. Roberts AirGuard Floor Underlayment - Best for Laminate Known for its durability and cushioning, the Roberts AirGuard is a standout for laminate flooring installations. Its thin design ensures it won’t rip easily, providing a stable and comfortable walking experience, even on radiant heated floors. 3. DUROCK Cement Backer Board - Ideal for Tile For those looking to install tile floors, the DUROCK Cement Board presents an optimal solution. With thickness options between 0.25 to 0.50 inches, it combats moisture and mildew, making it ideal for laundry rooms and kitchens. 4. Eco Cork Foam Premium Underlayment - Best for Concrete This waterproof underlayment offers antimicrobial features, discouraging bacteria growth in high-traffic areas. With a thickness of 3.2 millimeters, the Eco Cork Foam is perfect for basements or family rooms where moisture could be a concern. 5. DMX 1 Step 2.0 Underlayment - Best for Vinyl If vinyl planks are on your installation list, the DMX underlayment is integral to ensuring moisture and heat protection. Its dimples aid in adhesion to any subfloor, making it versatile for engineered hardwood as well. Understanding the Installation Process While selecting the right underlayment is half the battle, ensuring correct installation is key to your flooring’s performance. Here are some tips: Ensure your subfloor is clean and dry before installation. Follow the manufacturer instructions regarding the laying down of underlayment to prevent issues down the line. Use flooring spacers to maintain necessary expansion gaps. Final Thoughts on Hardwood Floor Underlayment The right underlayment can make a significant difference in the longevity and comfort of your hardwood flooring. By exploring your options and understanding the benefits they offer, you can confidently make a choice that suits your home. Whether you go with TrafficMASTER for affordability or opt for Eco Cork Foam for its added antimicrobial feature, knowing your options puts you on the path to beautiful flooring. Call to Action Ready to take the next step in your flooring project? Visit your local home improvement store to explore these underlayment options firsthand and consult with knowledgeable staff who can assist you in making the best choice for your unique situation.

10.14.2025

Finding the Ideal Kitchen Cabinet Height for Your Space

Update Understanding Kitchen Cabinet Heights: A Practical Guide Are you thinking about updating your kitchen? One detail that can truly elevate your kitchen's design and functionality is the height of your cabinets. Many people focus on the aesthetics of their kitchen but often overlook how crucial it is to have the correct cabinet height. When planning your remodel, understanding the ideal kitchen cabinet height is essential to achieve both style and convenience. What Is the Standard Kitchen Cabinet Height? The conventional height for upper kitchen cabinets is approximately 54 inches from the ground to their bottom edge. This height is determined by adding the base cabinet height, which typically stands at 34.5 inches, the standard countertop height of 1.5 inches, and the backsplash height of 18 inches. Achieving this balance allows not only for an appealing design but also provides ease of accessibility without the need for stools or chairs. Factors That Affect Kitchen Cabinet Heights Several factors will influence how high you should install your kitchen cabinets. Let’s take a closer look at the primary considerations: 1. Base Cabinet Height The height of your base cabinets plays a pivotal role in the overall height of your upper cabinets. If you have taller base cabinets, your upper cabinets will need to be higher as well to maintain an eye-pleasing proportion. For kitchens with 9-foot ceilings, opting for 42-inch wall cabinets is common, providing a neat finish with room for crown molding. 2. Countertop Thickness Another crucial factor is the thickness of your countertop, which can vary. It's important to ensure that there is adequate space between the upper cabinets and the countertop. A gap of about a half-inch should be intentional; ignoring this space might lead to unwelcome kitchen mishaps. 3. Cooking Range Considerations Safety is paramount; hence, maintaining proper spacing between your cabinets and cooking range is critical. The height should be sufficient to prevent the risk of fire hazards while cooking. Install cabinets with a mindful distance above stoves to ensure safety. 4. Backsplash Preferences Many opt for a backsplash above their countertops, typically standard at 18 inches high. However, it can be adjusted between 15 to 20 inches depending on personal choice and kitchen design aesthetics. 5. User Needs Lastly, the specific requirements of your household members should guide the height choices. Whether you have children who need lower access or taller adults requiring higher installations, adjusting the height to meet the needs of your family will greatly enhance functionality. Benefits of Getting the Height Right Choosing the right height for your cabinets is crucial beyond aesthetics; it directly impacts the usability of your kitchen. Here are some benefits of correct kitchen cabinet heights: Improved Accessibility: Avoid straining yourself by setting cabinets at a comfortable height. Enhanced Visual Appeal: Well-proportioned cabinets create a harmonious look that flatters your kitchen. Increased Safety: Proper distancing from the stove minimizes fire hazards and cooking-related accidents. Installation Best Practices Consulting with a professional during installation can lead to the best results. They will provide guidance on ensuring the correct height, factoring in the specific elements of your kitchen space. Remember, kitchen renovations can be complex, but small considerations like cabinet height make a big difference in the end. Conclusion Incorporating these factors when determining your kitchen cabinet heights can help you create a space that is not only functional but also beautiful. Thoughtful design choices combined with practical insights can transform your kitchen into a place that feels modern and accessible. Ready to remodel your kitchen? Whether DIY or with professional help, ensuring the proper cabinet height will lead to a successful kitchen renovation.

Terms of Service

Privacy Policy

Core Modal Title

Sorry, no results found

You Might Find These Articles Interesting

T
Please Check Your Email
We Will Be Following Up Shortly
*
*
*