Add Row
Add Element
cropper
update
Pleasanton Home Pro Media
update
Add Element
  • Home
  • Categories
    • Renovation
    • Doors
    • Lawns
    • HVAC
    • Painting
    • Pest Control
    • Handyman
    • Cleaning
    • Windows
    • Plumbing
    • Electrical
May 15.2025
3 Minutes Read

Transform Your Home: How to Regrout Tile in Easy Steps

Hands regrouting light beige tiles with a grout saw tool.

The Power of a Fresh Grout Job: Why Regrouting Matters

If your tile floors are starting to show their age with unsightly grout lines, consider regrouting as an affordable and transformative option. Regrouting not only revitalizes the appearance of your floor but also extends the life of your tiles. Old grout can harbor moisture, dirt, and even mold, damaging the underlying materials over time. By taking the time to regrout, you're investing in the long-term health of your home flooring.

Step-by-Step Guide to Regrouting Tile

Let’s break down the eight easy steps that will guide you through the regrouting process, ensuring you have gorgeous, clean grout lines in no time.

1. Gather Your Tools and Materials

Before you begin, you're going to need a few key items:

  • Grout mix
  • Tile sealant
  • Oscillating tool
  • Cloth
  • Bucket
  • Trowel
  • Knife
  • Cleaner
  • Toothbrush
  • Sponge
  • Grout float
  • Tile finishing tool

Having these materials on hand ensures a smooth regrouting process.

2. Clean the Existing Grout

Your first task is to thoroughly clean the existing grout. This involves scrubbing the lines with a bleach or hydrogen peroxide solution to remove dirt, grime, and any fungal growth. For stubborn stains, using a razor blade can help to scrape away the top layer of grime—just be careful not to scratch the tiles.

3. Prepare the Area

Once cleaned, you'll want to prepare the surrounding area. Cover drains with tape to prevent mess and examine each tile for damage. Removal of old grout requires a keen eye and sufficient space to work.
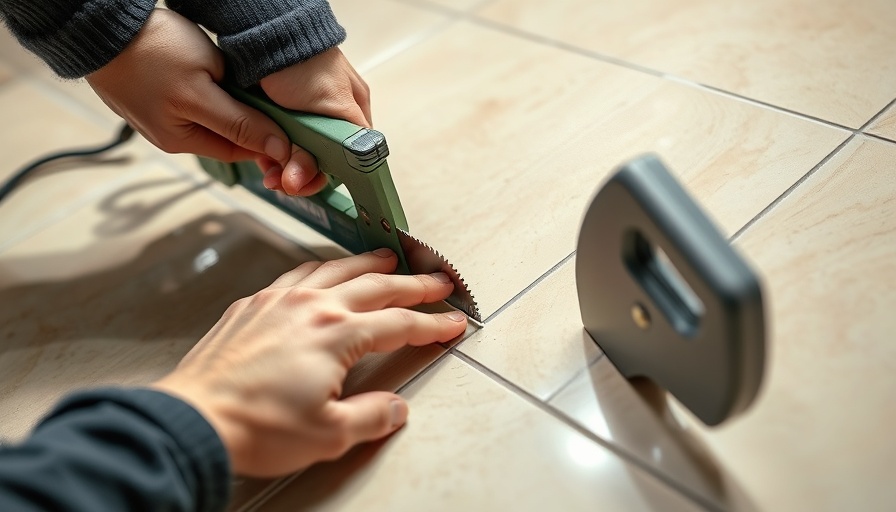
4. Remove Old Grout

Using an oscillating tool, carefully remove the old grout between the tiles, working slowly to avoid damaging the tiles themselves. This process might take some time but is crucial for a fresh start.

5. Vacuum Thoroughly

Before applying new grout, vacuum the entire surface. A clean area is essential for ensuring a strong hold with the fresh grout.

6. Apply Tile Sealant

Applying a tile sealant after cleaning helps protect against future mold and mildew. Ensuring the surface is sealed before regrouting is vital for longevity.

7. Regrout the Tiles

With your area prepared, apply the new grout using a float. Press firmly to push the grout into the gaps between the tiles, ensuring it fills all voids.

8. Finishing Touches

Once the grout is applied, wipe any excess from the tile surface with a damp sponge, being cautious not to disturb the grout in the joints. Allow it to cure for the recommended time before sealing it.

Conclusion: Why Regrouting is Worth Your Time

Regrouting might seem like a daunting task, but the results are worth the effort. Not only will you have revitalized tile floors, but you’ll also feel a sense of accomplishment by taking on the project yourself. It’s an excellent way to enhance your home's aesthetics without breaking the bank. So roll up your sleeves, gather your materials, and transform your tiles into something beautiful once again! Don't forget, when you love your home, every little step counts towards creating a comforting environment.

If you’re eager to dive into your regrouting project today, make sure to prepare thoroughly and take your time. Happy DIY-ing!

Renovation

4 Views

0 Comments

Write A Comment

*
*
Related Posts All Posts
08.09.2025

SPC vs WPC Flooring: Which Vinyl Will Transform Your Home?

Update SPC vs WPC Flooring: A Comprehensive GuideWhen it comes to flooring, choosing the right material can be daunting, particularly with the plethora of options available in today's market. Among these choices, Stone Plastic Composite (SPC) and Wood Plastic Composite (WPC) have emerged as frontrunners in the realm of vinyl flooring. Both options boast remarkable water resistance, durability, and aesthetic appeal, yet they cater to different needs and preferences.The Core Composition: SPC vs WPC ExplainedUnderstanding the fundamental differences between SPC and WPC requires diving into their unique compositions. SPC flooring features a sturdy core made from stone powder and plastic, giving it exceptional stability and resilience. This rigid core allows SPC flooring to withstand high levels of moisture, making it an ideal option for areas prone to spills and water exposure, such as kitchens and bathrooms.In contrast, WPC flooring, composed of a combination of wood fibers and plastic, offers a softer underfoot feel. While it retains water resistance, it is more suitable for residential settings where comfort is prioritized. The structure of WPC allows for greater flexibility, resulting in a warmer feel underfoot, making it a favorite for living rooms and bedrooms.Comfort Factor: How Do They Feel?One significant distinction between SPC and WPC lies in their comfort levels. Those who prioritize durability and hardness will likely gravitate towards SPC, which is designed to endure the rigors of daily life without losing its integrity. However, its inflexible nature can feel cold underfoot, especially in winter months.On the other hand, WPC offers a more cushioned experience, lending a soft touch that can make a home feel cozier. This flexibility and warmth make WPC particularly appealing for families and those seeking a comfortable living environment.Comparative Costs: Which Option Fits Your Budget?Price often plays a critical role in the decision-making process. Generally, WPC is considered more expensive than SPC due to its enhanced comfort features and softer composition. While the initial investment for WPC may be higher, homeowners may find the investment worthwhile for enhanced comfort and a luxurious look.SPC, while more budget-friendly, offers many of the same functional benefits as WPC without the premium price tag. Homeowners looking to upgrade their flooring without breaking the bank may find SPC a suitable alternative that doesn't skimp on style or performance.Installation Considerations: DIY or Professional Help?Both SPC and WPC can typically be installed as a DIY project, thanks to their click-lock installation methods. This feature makes the flooring accessible to homeowners eager to take on their projects. However, professional installation might be beneficial, especially if you are unfamiliar with flooring techniques or if your space involves intricate layouts or patterns.Before settling on a flooring type, it's wise to consider the long-term maintenance and care needed for each. PCP floors often require less upkeep compared to WPC, making them an excellent choice for busy households.Emotional Value and Aesthetic AppealUltimately, the choice between SPC and WPC also comes down to personal aesthetic preferences. SPC can mimic the natural beauty of stone or wood, while WPC often simulates wood textures more authentically. Whichever option you choose, thoughtful selection can harmonize your flooring with your home's design, reflecting your personality and style.Conclusion: Making the Right Choice for Your HomeWhen weighing the benefits of SPC versus WPC flooring, consider the environment and purpose of the space. Both options have their unique advantages, catering to different preferences and needs. Taking into account factors such as comfort, durability, aesthetics, and budget can guide you toward a decision that boosts the beauty and functionality of your home.

07.20.2025

Discover the Best Tile for Shower Walls in 2025: A Homeowner's Guide

Update Choosing the Right Tile for Your Shower: Why It Matters Updating your bathroom is not just a home improvement project; it’s an investment in your sanctuary. The tile you choose for your shower walls can not only enhance the aesthetic appeal of your space but also influence its functionality. With various options available in the market, understanding the benefits of different materials is essential to ensure longevity and ease of maintenance. Top Shower Tile Options for 2025: Navigating Your Choices As we step into 2025, the choices for shower wall tiles are both diverse and exciting. Homeowners can select from ceramic, porcelain, and natural stone, each with its unique appeal and durability. While aesthetics matter, practicality such as water resistance and maintenance should also be key considerations in your decision-making process. Ceramic vs. Porcelain: What’s the Difference? Most people often confuse ceramic and porcelain tiles, but they present distinct differences that can affect your choice. Porcelain tiles undergo a more intense firing process at higher temperatures, making them denser and more durable than their ceramic counterparts. This density ensures that porcelain tiles are much less prone to cracking or water damage. Conversely, ceramic tiles typically come at a lower cost—ranging from $0.50 to $7 per square foot—making them a more budget-friendly option. They do have a decorative glaze that can wear over time, leading to potential chipping and fading of their pattern. For long-term use in moist environments, porcelain's superior durability makes it the recommended choice. Varnished Ceramic Tiles: The Economic Marvel If affordability meets functionality, varnished ceramic tiles are your answer. With an array of designs, these tiles offer a stain-resistant and non-porous surface due to the glass-like coating. This protective layer prevents water from seeping into the tile, minimizing mold and mildew growth—critical factors in damp areas like showers. Homeowners will appreciate that varnished ceramic tiles do not only provide visual appeal but also allow for easy cleaning, making them a practical solution suitable for families and busy homeowners alike. Glazed Porcelain Tiles: The Robust Hero Glazed porcelain tiles are an ideal blend of beauty and durability. With a water absorption rate of 0.5% or less, they stand out as water-resistant and resilient against potential mold and mildew issues. Their dense and non-porous nature retains their elegance over the years, withstanding normal wear and tear within moist environments. Available in an impressive variety of colors and designs, glazed porcelain tiles not only fulfill a practical function but also allow for creative expression in bathroom design. They fit perfectly into a modern aesthetic, elevating any bathroom into a luxurious retreat. The Importance of Maintenance: Keeping Your Tiles Pristine While the tile materials play a crucial role in durability, understanding proper maintenance techniques ensures your investment stays in great shape. Regular cleaning with non-abrasive agents, along with resealing grout, can ensure longevity and maintain their sparkle. It's vital for any homeowner looking to enjoy a beautiful bathroom for years to come. Conclusion: Make an Informed Choice for Your Shower Choosing the right tile is more than just a design decision; it's about creating a lasting impact in your bathroom that enhances your living space. With porcelain and ceramic tiles leading the way as top options, consider your budget, the longevity of materials, and the maintenance they require for a successful upgrade. Whether you prioritize aesthetics, affordability, or durability, making an informed choice is crucial for a successful shower renovation. Embrace the opportunity to turn your bathroom into a healing retreat that warms your spirit every time you step inside.

07.17.2025

Buying a Shed Kit? 6 Essential Considerations for Homeowners

Update Think Beyond Just a Shed: Understanding Your NeedsBefore you dive into the world of shed kits, it's crucial to take a moment to reflect on what you truly need. What purpose will the shed serve? Will it be a cozy space for potting plants, a storage haven for tools, or perhaps a workspace for your latest DIY project? This foundational understanding impacts everything from your shed’s size to its layout and features.Budgeting Wisely: What Extras You Might OverlookAs you explore options, remember that price tags can be deceiving. While one kit may appear inexpensive, additional costs for essentials like flooring, locks, and roofing can quickly elevate your budget. Think about longevity, too. A budget shed might be tempting now, but if it isn't durable, it could lead to unexpected repairs in the future. Investing wisely means you're likely to save money—and headaches—in the long run.Size Matters: Finding the Right Fit for Your SpaceWhen considering size, bigger isn’t always better. It’s helpful to carefully measure the area where the shed will sit, but also consider practical elements like access paths and drainage. Large sheds can be more expensive and may require more maintenance. Create a realistic plan of your internal organization ahead of time to visualize how much space you genuinely need. You might just find that a smaller, well-organized shed meets your requirements perfectly.Navigating Local Regulations: Don’t Skimp on ComplianceMany homeowners mistakenly believe that small sheds don’t require permits. However, your local council may have specific regulations regarding placement and height that you must adhere to. It’s always safer to check on required permits before you commit to a kit. Ignoring this step could lead to fines or unwanted complications down the line.Maximizing Utility: How to Think Beyond Basic FeaturesOnce the purpose of your shed is clear, consider how you can maximize its utility. If you'll spend hours in there working on hobbies, prioritize ventilation and lighting. If it’s solely for storage, durable shelving and strategic organization can be game-changers. Remember, the design elements can significantly enhance your experience once the shed is in use.Consulting with the Community: Learning from Local StoriesCommunity discussions can be invaluable. Speaking with neighbors who have tackled similar projects can provide insight you might not find online. Engaging local forums can also unearth lessons learned from their experiences, helping you make a more informed purchase that aligns with your home environment and the unique aspects of your community.Taking Action: Step Toward Your DIY Shed ProjectNow that you have a clearer understanding of what considerations go into selecting a shed kit, it's time to take the leap. Whether you're convinced of your objectives or eager to consult further with your community, starting this journey could lead to a rewarding backyard transformation. Together, let’s invest in our homes—one thoughtful choice at a time!

Terms of Service

Privacy Policy

Core Modal Title

Sorry, no results found

You Might Find These Articles Interesting

T
Please Check Your Email
We Will Be Following Up Shortly
*
*
*